
How to build a mini drainpipe wetland
Do you wish you had a pond, but don’t have the space? Here’s a great idea to turn your drainpipe into a mini-pond with built in water supply – you’ll have your very own wetland reserve. And it’s virtually maintenance free.
Just like huge landscape-scale wetlands, a mini-wetland will slow the flow of water which creates great wildlife habitat and helps to regulate flooding, drought and pollution.
Think of it not so much as a bug hotel but more an eco-friendly spa resort that benefits the wider environment!
Your 'drain'-pipe dream
Your drainpipe can funnel rainwater from a relatively large area and focus it into one place.
At its foot, you’ll need a flowerpot filled with gravel, as a filtration bed to ensure clean water enters your wetland. The wetland itself is simply two containers – recycle anything to hand like washing bowls or under-bed storage boxes. The first container will become a rain-fed pond, and this can overspill into the second box which will become a mini-flood plain.
You’ll then need somewhere for the water to seep slowly away – either directly into a drain or downhill into a garden if you have one. You can build this mini-wetland in even the tiniest urban space – but make sure you don’t end up creating a puddle against your house which could get in through cracks and cause damp.
The final step is to plant up your mini-wetland and clad it in wood, stone, bricks and mud – again anything to hand – to provide lots of nooks and crannies for mini-beasts to move into.

What you’ll need
Necessary
- Two broad containers – this is a great way to reuse large plastic containers or tubs
- Garden soil or peat-free compost
- Gravel
- Aquatic and water loving plants – keep back a couple of flower pots
- Wood, stone, brick, mud or any material you can recycle to clad your mini-wetland
Nice to have
- A small cheap sheet of membrane from a garden centre
- Aquatic compost (heavy pond soil to weigh down plants)
- Horticultural grit
A unique garden feature
Don’t be constrained by these lists. If you want to get creative, use whatever materials you can find to make the mini-wetland your personal piece of art.
You’ll need to design it uniquely anyway to fit the space you’ve got. So please take our instructions as general inspiration, but the actual design and look can be whatever you want.
Building your mini-wetland
Step 1: Floodplain box
- You’ll need to build from the bottom, so start with where water flows out from the bottom of the second box.
- In our example we simply cut a hole so that water could fall directly into a drain. But if you can direct the water to feed other areas of your garden, maybe using a hosepipe to transport it, then great.
- Fill the box firstly with a layer of gravel, and then a pervious membrane, which will support a layer of growing medium on top. Use either garden soil or peat-free compost.

Step 2: Pond box
- The pond box will need to be propped up so that the drainpipe can feed it from above, and then it can overflow into the floodplain box below. You’ll need an overflow hole in the side of the box for water to overspill into the floodplain box.
- Over time you may find the average water level is either too low or too high to overspill regularly – in which case you can re-drill another hole at a different height.

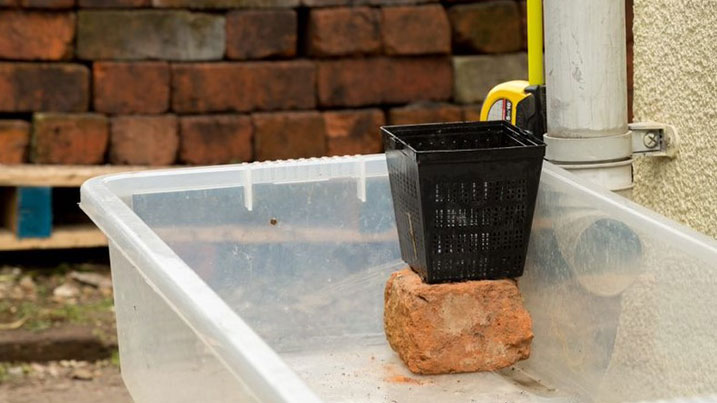
Step 3: Filtration box and drainpipe
Fill a recycled plastic flower pot with gravel and prop it in the pond. Use a mesh pot or stab additional holes so achieve a good water through-flow.
By stacking up the pond, floodplain and filtration boxes, you can get an idea of where you’ll need to cut the drainpipe so that it’s the right height. But don’t cut it till the end because you’ll probably end up adjusting the whole thing as you plant it.
Step 4: Choosing aquatic plants
Ask your local plant supplier for advice on a range of native UK aquatic plants for your pond box, and wetland plants for your floodplain box. Factors affecting your choice will include light, soil and whether your drainpipe tends to have a little or lot of rainwater pouring down it.
For both boxes, consider what textures, colours and spread of plants you want. For the wetland box, you’re looking for plants that can cope with long periods of dryness with occasional bursts of heavy water. Ferns are often good in lower light conditions.
In our example we use iris, watercress (yes you can eat it!), marsh marigold, lesser spearwort and cuckoo flower in the pond box (it probably won’t be deep enough for the likes of waterlilies) and soft shield fern, thrift and pendulous sedge in the floodplain box.

Step 5: Potting the plants
Re-pot the aquatic plants into a larger mesh pot so that they have growing space – but don’t throw away the mesh aquatic pot they come in, as it might be reusable as a filtration box. Plant the floodplain box plants directly into the soil. Don’t plant too much – they’ll need space to grow.
Aquatic compost – a heavy dense version – will help keep the aquatic plants in place and won’t dissolve into the water. A sprinkling of horticultural grit on top will help to weight them down.

Step 6: Cladding
By now you’ll have a possibly disappointing looking rickety pile of boxes. So now’s the time to clad it by recycling anything you can find. In our example we had lots of bricks to hand. But wood, stone, mud, plants, hollow twigs and all sorts of material can be used. Cladding will:
- Secure the pond and floodplain boxes in place – make sure the cladding is substantial and heavy enough to be unaffected by wind or animals and children brushing past.
- Provide wildlife habitat – as many nooks and crannies as possible will attract all sorts of mini-beasts and if you’re very lucky, frogs and even newts or lizards too.
- Look fantastic – whether it’s naturalistic or artistic, it’s your choice what materials and feel you end up with so that you’ll love looking at it.

Step 7: Testing and securing
Think of your mini-wetland initially as a temporary structure which you can move and adjust till you get a regular overspilling of water through the system.When you’re happy with its height and position, use a hacksaw to cut the drainpipe to the right height.
You may need to buy a replacement shoe (the spout) if you can’t slide the old one off to reattach – these cost around £3.
Over time, adjust the angle of the pond box or height of the overspill into the floodplain box until you’re happy that water spills through the system when it rains. You can then shore up the cladding and make a more permanent structure if you want, possibly even using mortar. But remember you may need access to your drain in future so make sure you can still get to it easily.

Step 8: Onward maintenance
Let the pond fill with rainwater rather than tap water (it will be cloudy at first but will clear). Rainwater will keep the pond largely algae free because it contains fewer chemicals than tap water.
Cut back the plants as per their instructions. For many plants this will be once a year at the end of the growing season. At the same time cut back any aquatic plant roots that have grown out from the mesh pot they’re in.
And that’s all you’re likely to need to do!

Be brave - your mini-wetland will help the wider environment, and if in future you want to go back to the drainpipe, a new 2.5m drainpipe only costs around £6.
Need more convincing?
Here are three reasons you should add water to your garden
- The most important thing you can do for nature in your garden is to provide water. Your mini-wetland will turn what might be a functional wildlife-free piece of wall into a little watery haven for mini-wildlife. If everyone built one at the foot of their drainpipe, this would create millions of tiny wetland wildlife reserves.
- It would also slow down the flow of water speeding off our increasingly urban environment, full of hard concrete and tile surfaces which don’t absorb water in the same way that natural landscapes can. Instead, these hard surfaces speed the rainwater run-off down drains into rivers, contributing to subsequent flooding. But by slowing the flow of water, we can reduce the risk of drains filling and backing up during heavy rain, or overloading rivers and causing flooding.
- Conversely, slowing the flow also maintains a slow and steady flow of water into rivers when it doesn’t rain, which reduces the risk of them running dry. By filtering the water, you can make it cleaner too. So building a mini-wetland isn’t just good for the people and wildlife in your garden: It’s good for people and wildlife in your wider community too.


